A few months ago, I was shopping a a really cool quilt shop in Fort Collins, called Jukebox Quilts. My friend Kelly is the owner, and over the years, I’ve seen these really cool portraits that she has her friend, Leslie, make of her children.
Leslie Gabrielse is from Rotterdam, in the Netherlands, so Kelly was really excited to tell me about the upcoming class in October…. Yikes!! I knew I was going to be gone on vacation to Ireland for a couple weeks in early October. Lucky for me, the dates were October 25-26th. I thought to myself… I’d really love to take this class, but I just know I’m going to have a stack of paperwork at the office, and probably a pile of customer quilting to do. My husband Joe, however, had a different perspective. He said to me, “Brian, you’re going to take this class. You know you can get everything done. A chance to learn this technique from Leslie just might not come around again.” So, of course I signed up!
While on vacation in Ireland, I received the emailed class supplies shopping list. Oh my goodness… Acrylic Paints and brushes, specialty art gauze, perle cotton threads, and of course fabric and batting. Well, I could probably cull the last two items from my stash, but what about all that other stuff. Fortunately, I knew a weekend in Boulder, Colorado was between me and the class dates, so I figured I’d go art supply shopping then.
I set to work, when I got home, and chose about 8 photos that might be good candidates for my class project. I did go on the shopping trip to Boulder, and found all of the supplies. I must give a big shout out to the guy at Meininger’s Art Supply in Boulder. He was so helpful, and when I showed him some of Leslie’s works from the internet, he was blown away. I must remember to email him my finished project.
I headed to Fort Collins the evening before class, so as to be rested and ready for what I knew was going to be an intensive two days of learning and fun.
 The first day began with some artsy playtime. No, don’t get out your fabric yet… we’re going to paint on paper. Make two different paintings, and then we’re going to cut them up and weave the two back together into one.
And so we did. Mine is the second row up in the middle. I think everyone did a great job. This exercise helped us to get out of the quilter’s mind space, and into the artist mentality.
Of course there is some similarity, as we were all told to bring white, black, red, blue and yellow acrylic paints.
Next, we were instructed to create a stencil using a drawing of our own. “Be very careful in cutting it out, because you’re going to use the positive and the negative shapes you created.”
I first drew a butterfly, all scrolls and graceful details, but very detailed. Leslie came by, and told me I should consider simplifying it a bit, because we weren’t just going to stencil the obvious image. So I created a sort of star. It was pretty cool. In this session, we learned about using stencils and stencil brushes, of course. But what was really neat, was the discussion about positive and negative shapes, and how they can both combine to create lines in your work. Wow! Now we get to grab a piece of fabric that we brought… YESSSS, Now we’re getting somewhere. The paints act much different on the fabric than they did in the prior session painting on paper. After a few strokes, we were starting to get a feel for how much paint to load into the brush, and the pressure to use for a nice pleasing amount of paint on the fabric.
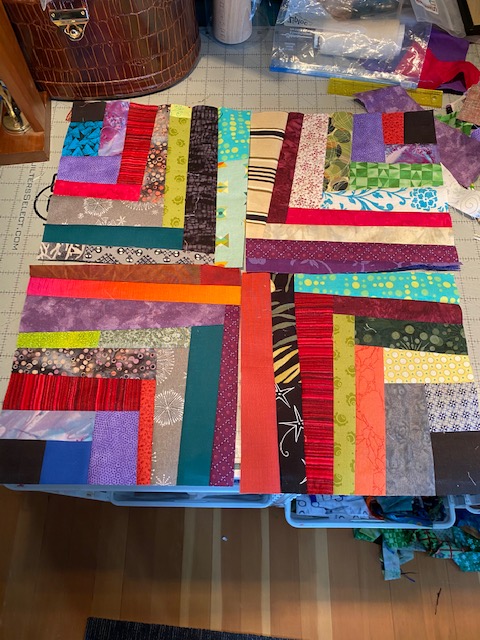
 Our stenciling efforts are pictured here: (Mine is the top right)
The last couple hours of the day, we were treated to a step by step slide show of Leslie creating one of his beautiful works. Aha! This is why I’m here. Things are going to be great.
After the slideshow, we were dismissed for the evening. I had decided on which photo I was going to tackle in fiber. The local FedEx/Kinko’s made me a nice enlargement of the small photo to the size I had decided — 22″ x 28″. I grabbed a quick bite to eat, and went back to my hostel to relax and dream about the fun journey I was sure to begin the next day. Yeah, that’s right, a hostel. I’ve never tried one before, but Kelly raved about the Fernweh Hostel, so I decided to give it a try. It was incredible. I will definitely stay here again someday.
The next morning, I was ready to begin. We started out by transferring our plan to a piece of that specialty gauze. Here’s where mine started…
We then started adding bits of fabric under our drawing. At this point, you’re trying to achieve the color and shading effects. The fabrics are raw-edge, and held down with hand stitching using the perle cotton threads. I’m glad that I had brought a range of neutrals from white to black, with beige and grey pieces filling in the range. I also knew the sweatshirt had to be orange, since it was a favorite one of Joe’s. (I think I sewed new cuffs on that thing a couple three times over the years, before it was eventually retired).
What I hadn’t planned on, was the background variety. Good thing the class was upstairs from the quilt shop. Five or six fat quarters ought to fill it out nicely.
At the end of the day, I was to this point.
Now, mind you… the plan is to eventually remove the cartoon road-map overlay. When we all put our work on the wall… Leslie gave us some critiques, and praises. He was really pleased with everyone’s progress, but on mine, he told me I should be DONE! What, stop here? He said yes, and keep the drawing in place and frame it. He said it had a Matisse quality, and he really liked it. Well, I liked it too, but I wanted to see this project to the end.
So of course, I did. The picture will be at the end… I think you’d like to see the group from the class first. Right?

I’m in the middle, and Leslie is on the far right. It was an amazing group, and everyone did such amazing things that day. I’m hoping to hear from each of them, as they finish their project.
I do have some pictures of their creations at the end of the class…
This slideshow requires JavaScript.
As you can see, everybody did their own thing. We took the great information and concept, and had fun. Art should be fun.
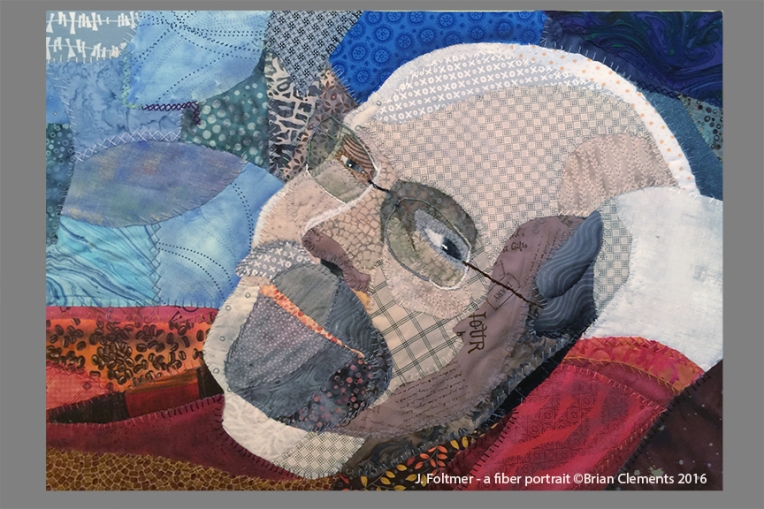
I’ve been engrossed in my creation, so as promised… here is my finished result. I stretched it over the stretcher bars today, and added a hanging wire. I gave it to Joe. He loves it! A friend came by and saw it, and it brought tears to her eyes. I guess I did alright… You be the judge.
I hope you’ve enjoyed this peek into my last couple of weeks, and that you’ll also be inspired to try something new and out of the box. Classes are a great way to learn a new technique, get out of your studio and your routine, meet new people, and just have fun. Who knows what will come of it.
Hope you have a great week.
Thanks for stopping by!
Fellow Quilter,
Brian